
There's a reason why explainer videos are some of the most popular types of video to make... they're ridiculously effective! From explaining how you help prospective customers to the basics of quantum physics, explainer videos help you communicate your message with ease.
Which is why in this blog we'll be covering everything you need to know about creating your own explainer videos. Including what exactly an explainer is, what the best ones look like, and how to plan and create an animated explainer that's guaranteed to deliver results.
You can read our step-by-step guide all the way through or jump to sections you're most interested in using the links below 👇 Let's get started!
What is an explainer video?Awesome explainer video examples to inspire you
Part 1: Planning your explainer video
Setting objectives, defining audience and context
Writing your script
Storyboarding your video
Part 2: Making your explainer video
Recording your voice-over
Adding backgrounds, images and graphics
Arranging elements and adjusting timing
Adding music
Part 3: Sharing and refining your explainer video
Publishing and sharing your video
Measuring results and iterating
What is an explainer video?
An explainer video is a short video (usually 1-2 minutes long) that's used by marketers, sales people and educators to help audiences understand their message, business or idea.
They're so powerful because they use simpler language and more visuals than lots of other forms of content which makes them much easier for our brains to digest and remember.
While your explainer video could feature live action video, the best explainers are usually animated. Animation appeals to auditory, visual and kinaesthetic learners as it combines images, movement and sound, enhancing the impact of your video.
You can showcase your explainer video almost anywhere, but the most popular places to share explainers are on websites, social media, blogs, in emails or in person as part of a presentation. Let's take a look at some examples 👇
Awesome explainer video examples to inspire you
As explainer videos are so popular, there are plenty of places to look to get inspiration for your own! Here are 3 of our favorites created by fellow VideoScribers:
This first example was created by VideoScribe Awards winner and founder of Exaltus, Carole Alalouf. We love this whiteboard animation style video that gradually builds out into a full picture of the information. It's not only very visually appealing but it reinforces the key message.
Our second example comes from Barrister and founder of The Law in 60 Seconds, Christian Weaver. In this case Christian's explainer is educational - helping people better understand the UK's new proposed Police, Sentencing and Courts Bill. The information all fits into one stopwatch which again visually reinforces Christian's key focus on explaining elements of the law in bite-sized chunks.
This final example comes from Stefan Dimov, founder of Project Caritas on YouTube. Stefan helps sustainable brands tell the story of how their business and products came to be in quick mixed media videos. As this is part interview, part explainer, the way Stefan switches between talking heads footage and animations not only keeps us engaged but it helps us build our mental picture of how the Velosophy bicycles are made.
If you want to create videos like these for yourself, why not try VideoScribe for free with a 7-day trial (no credit card details needed!). Just sign up below with your name and email address and start creating 👇

Part 1: Planning your explainer video
Now you're fuelled with some excellent inspiration, it's time to start bringing your own explainer video to life. Like all good things, that starts with planning!
If you're thinking about skipping this step, we can only remind you of the classic proverb once said by someone very smart - "If you fail to prepare, you prepare to fail". It's still true here - without a goal in mind for your video it can end up turning into an animation that doesn't meet your needs. So take the time to work through the next three steps.
We promise you'll thank us later! 😁 Here's a quick video overview of what we're going to be covering but read on to learn about each step in more detail 👇
1. Plan your video: objectives, audience and establishing context
Objectives:
First things first, we need to set out some objectives. What is it you want this video to deliver? It could be that you want to boost enquiries about your product or service, or simply that you want your class to understand the basics of quantum physics... 😂
Whatever it is, make sure you've written your objective down and agreed it in advance with any additional stakeholders that need to be involved. Once you have your objective, highlight a couple of metrics you can use to measure success. For instance, prospective customers have clicked on the link next to your video to get in contact, or your students improve their test results by 10%.
That way, you'll be able to clearly assess whether your animation has delivered what you wanted, or if it still needs a bit more work.
To help you keep track of your planning, use our free worksheet 👇

Audience:
So we know why you want to create an explainer video, now we need to know who it's for? Who is your target audience for this animation?
Whether it's your prospective customers, colleagues or students, it's key to identify who these people are and most importantly, what's going to persuade them to buy your products or help them understand your information. To help you build a picture of your target viewer try answering these questions:
- What problem keeps them up at night?
- What one thing would make their life easier right now?
- Why do they need this problem solved so badly?
- What existing ideas and principles do they already know and understand that you can relate to?
- What emotion would they feel if you solved their problem or helped them understand this concept?
Context:
By context we mean, where is your video going to be used and so what additional information might we need to include? For instance, if this video is going to live on your website, you wouldn't include a call-to-action at the end that says 'Visit our website for more information'. You'd probably want to say 'Click below to get in contact'. Similarly, if you're going to share your explainer video in person, you might want to leave out a call-to-action so you can say it in person at the end.
It's making these little changes later on that can be time consuming, so take a minute to think through your video uses now.
2. Write your script
Okay, that was some intense thinking work done 🎉 Reward yourself with a quick coffee and snack break if you haven't already ☕️
Now it's time to start vocalizing your message. From working through your objectives and thinking about what makes your audience tick, you probably have a good idea of what you want to say. In this step we're going to put some meat on those bones and build out a full explainer video script.
We do have a dedicated guide to writing explainer video scripts that you can find here. But for today we're going to walk you through the key steps to craft your script.
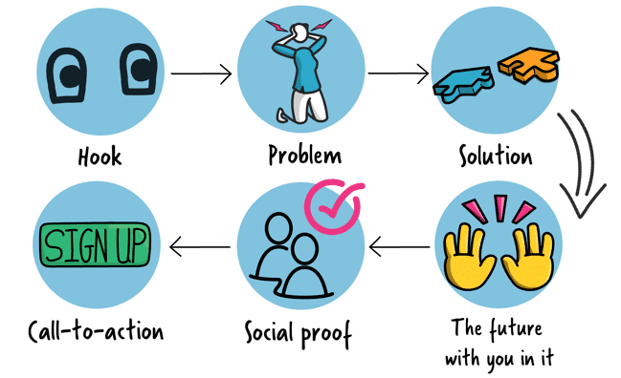
It all starts with your structure - again you might naturally have found this flow as it's the most common process for an explainer video. We call this the 'Problem to solution' structure and you can see a diagram of it below 👇 Essentially this helps us set the scene for the audience, empathize with their problem and then present yourself or your products and services as the key to their happily ever after.
 To do this we recommend taking the following approach:
- Write down your 'must have' information - these are the key bits of information you absolutely have to get across.
- Create your hook to grab attention - there are lots of ways to do this. Popular options include amplification where you show the scale of a problem by using a reference point to compare it to. Another is sensory - this is where you describe a situation in vivid detail to help your audience picture it. A firm favorite is the puzzle or question starter where you begin by asking your audience to solve something as this gets them engaged in the content.
- Empathize - show you understand your audience's problem by describing the feelings associated with it.
- Introduce the solution or information - set out exactly why your product, service or information is going to make their problems go away.
- Paint a picture of what the future looks like with you in it - be as detailed as you can here to help them really visualize themselves in the world you're creating.
- Reinforce with social proof - we're all conditioned to check reviews to make sure what we're seeing isn't too good to be true so answer any niggling doubts by including customer feedback or statistics in your video.
- Tell your viewer what to do next - lastly wrap things up with a short sharp call to action. Nothing too complicated that could get confused, most likely pointing viewers to where they can talk to you.
3. Storyboard your video
The last step in your explainer video planning is to create a quick storyboard. Now this doesn't have to be anything fancy and it certainly shouldn't take you ages to do. Here's a quick overview 👇
Think of your storyboard as your grand plan. It combines your script with ideas for your visuals and any extra scene transitions and on-screen text. To get started creating your storyboard, chunk your script up into scenes. A new scene should be created for each new message as you want your visuals to closely link up with the voice-over.
Once you've mapped out your script into scenes, it's just a case of adding thoughts and ideas for the accompanying visuals. These could be screenshots of similar videos or images you've seen online, your own images or content from the VideoScribe image library. It doesn't have to be polished or final, it's just to work through the content and ensure you have an idea of what you'll include in each section.
Not sure where to create your storyboard? You can draw it out by hand on paper, or we have a handy free storyboarding template that you can add your ideas to. Just click the button to download it 👇

Part 2: Making your explainer video
Now that's all the planning done you can move onto making! It might seem like you spent a lot of time preparing to create your video but trust us you'll be glad you did as we move onto the next steps. All your hard work planning will really pay off as making your video is going to be a whole lot quicker and easier.
1. Record your voice-over
The first thing to do is record your voice-over using the script you wrote earlier. This will act as the backbone of your video and inform the timings of your animations - after all, you can speed up how quickly the images draw, but your voice-over won't sound quite right in 2x speed... 🙉
So, to get a good quality audio recording, you want to make sure you're set up for success. Think about the following things:
- Where you'll record your voice-over - you want somewhere quiet and well insulated (i.e. no creaky floorboards or echoey spaces)
- Minimizing distractions - it's hard to remove all background noise but with a bit of careful planning you can get pretty close. So remember to turn off any air conditioning, close windows, turn off phone or computer notifications and ask anyone in your space to be quiet while you record.
- Checking your tech - make sure you've got a good quality microphone, headphones to listen back to takes, and you might want to use additional audio editing software like Audacity. You can record your voice-over straight in VideoScribe but if you think you might want to edit sections then it's often easier to record into editing software first.
- Preparing your voice - grab a glass of water in case the dreaded dry mouth kicks in, warm your voice up by talking through your script and remember to smile as you talk - it makes you sound more naturally friendly!
For a full run down of all our voice-over recording tips, download our free perfect voice-over checklist that you can run through before you start recording 👇

2. Add your background, images and graphics
Now grab your pre-prepared storyboard as it's time to start work on your visuals. For this section we're going to be talking about creating your video in VideoScribe but of course you could apply these principles to whichever software you're using.
The key here is to set the right scene with a background that makes sense for your story. It could be set in a classroom, on the beach or in outer space - whatever make most sense for your audience. Equally, your video could be set on a whiteboard background letting your message and content stand out. Just make sure that everything you choose to add on top of your background fits with the theme you've created. For instance, if you're going with a whiteboard animation theme, you might want to choose images that are drawn in a simple line style to match a whiteboard.
When it comes to selecting the right images, you can choose from our extensive library in VideoScribe, upload your own or import photos and GIFs. Giving you full reign to make the animation your own!
Just make sure that there's good consistency in the colors used, style of images and sizing to ensure your final video looks cohesive and doesn't detract from your message. Learn more about video design in our guide.
3. Arrange elements and set timing
Once all your images, text and graphics are on your canvas, you'll want to align them to your voice-over. To do this it's just a case of previewing the video and then adjusting the length of animation for each element to fit with the timing of the audio.
It's at this point you can also get more creative with the way your images and text appear - choosing from having them hand-drawn, appearing as if by magic, bouncing in and more. For an even more impressive effect try using the morph option to make images transform from one to another, appear to grow or shrink or rotate 👇
4. Add your music
The final touch is adding some background music and/or sound effects. With this, your video will suddenly feel complete. Music can be incredibly emotive and so if you're looking to evoke a specific emotion, from happiness to concern then use music to bring that feeling to the forefront.
When it comes to picking the right track you want to be mindful of a few things:
- Length - is the piece/s of music long enough to cover the whole duration of your video or will you have to repeat the track?
- Pace - something too fast or too slow can be off putting so make sure your music moves at a similar speed to your voice-over and content.
- Volume - your background music should be in the background, don't let it take over your voice-over. Make sure you've reduced the volume of your music to let the rest of the content shine. This is easy to do in the audio options in VideoScribe.
- Genre - again, if your video is calm and reassuring you don't want to go in with a heavy rock track so filtering your music choices by genre can help you find something suitable quicker.
Once you know what sort of track you're looking for, you've got lots of options to choose from for royalty free music. In VideoScribe we have hundreds of free to use music tracks covering all genres that you can choose from directly in the software. But if you can't quite find what you're after, check out our favorite royalty free music sites here.
With that, your explainer video is complete! 🎉
Part 3: Sharing and refining your explainer video
1. Publish and share!
Time to share your explainer with the world! This step is often both exciting and terrifying in equal measure - how quickly will your views start racking up and will it deliver the results you expected?
To publish your video in VideoScribe click the top right hand 'Publish' button and select from the available options including publishing to PowerPoint, Vimeo, Sho.co (our own platform), or downloading as .MOV or .WMV.
Which option you choose will depend on where your video is going to be used. So consider which option is right for you. Learn more about publishing in VideoScribe here.
You're then ready to add your video to your website, share on social media, embed in emails (learn how here) or present in person. Let the world know what you have to say!
2. Measure results and iterate
Wherever you shared your explainer video, be sure to track it's performance. For instance, if you added the video to your website, track how many times that page has been looked at, how many times the video has been played and what your viewers did afterwards. Did they take the desired action you wanted?
In some case you might find that you need to tweak your call-to-action or cut or add bits of information to achieve optimal results. This iterative process is important to get maximum value for your effort and with VideoScribe it's easy to go back in and make edits. So don't be afraid to adjust your explainer as you get feedback and results to make it the best it can be.
Learn more about measuring video success in our quick how-to animation 👇
With that, you're ready to create your own animated explainer videos and VideoScribe can help. Just start a free 7-day trial (no credit card needed) or join our creative community as VideoScribe subscriber to make your first video! 👇

.png "VideoScribe")


![How to create animation magic [3-part guide to video success]](https://blog.videoscribe.co/hubfs/How%20to%20create%20animation%20magic%20guide%20VideoScribe.png)
.jpg)

COMMENTS