
Explainer videos are arguably one of the hardest types of video to create. You only have between 30-120 seconds to communicate your message and leave a lasting impression.
So how do you make those seconds count? The secret is in how you plan your video.
In our last blog post we discussed the 8 steps to plan your explainer video for success. From setting objectives through to defining your target audience and understanding what moves, frustrates or motivates them.
The next step in your journey to explainer videos that stand out, is building your storyboard. In today’s blog we’re sharing our guidance on storyboarding complete with a free template to put what you’ve learned into practice.

What is an explainer video storyboard?
A storyboard is a simplified visual representation of how your planned video will unfold. It’s usually a sequence of images or drawings with an accompanying script, text and directions that represent each scene.
Your storyboard can be sketched by hand or on a computer. Just bear in mind, choosing the latter lets you make amends easier, improves the range of images you can add from the internet or animation software, and also makes sharing your storyboard easier.
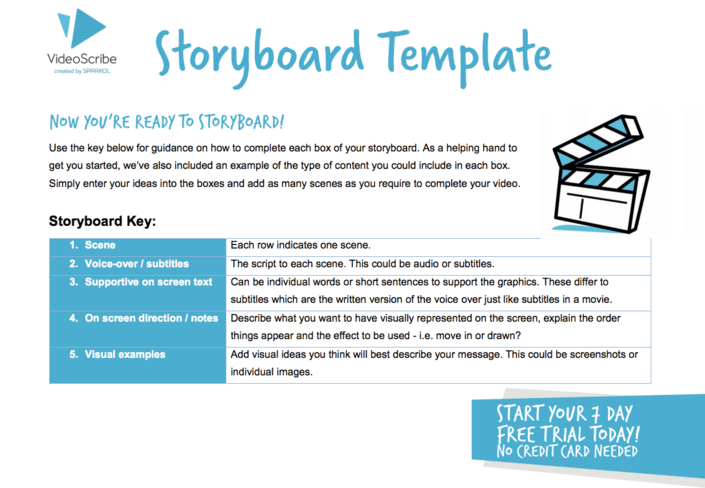
Click here to download our free explainer video storyboard template now.
The undeniable benefits of storyboarding
Now you might be thinking, this sounds like a lot of work, do I really need to create a storyboard?
The answer is always a big fat YES! These are just some of the reasons why storyboarding is such a powerful activity and a critical part of planning your explainer video:
- By planning your video scene by scene you’ll be able to spot any potential problems or gaps and resolve them before you invest more resources
- When you have set time-constraints, a storyboard helps your explainer video stay on track
- If you’ll be working with an agency or video production company, your storyboard is a perfect brief
- Your storyboard is a great framework for colleagues to provide feedback on before you move to production, ensuring everyone is happy with the end product
- Storyboards give you a better idea of pacing and how the video will develop
- Cut the fluff, a storyboard forces you to focus and be on message
And don’t worry - our free explainer video storyboard template makes the whole process a lot easier and means you only have to focus on the fun creative bit.
Step 1: Draft and add your script for the voiceover or subtitles
Start with the star player in your video - the script. The script determines how long your video will be but try to stick to between 1-2 minutes which usually works out to 500 words or less. Your script tells the persuasive story of the pain point your target audience has and how your organisation solves it.
Depending on whether your video is designed to be played aloud or needs to make sense on mute will determine whether your script has a voiceover, subtitles or combination of both. Once you’re happy with your script, simply chunk it up into scenes that will need separate visuals and add it to column two of our storyboard template.
Step 2: Make a note of supportive on screen text needed
While your script can explain your message in full, having some text that supports your point on the screen can help reinforce your story. Use column three in our template to detail any key words or additional information you want to share.
Just be careful not to overwhelm your screen with too much text and make sure any words you do add give extra value to your audience.
Step 3: Consider what visuals you’ll need to tell your message
Your script is only half the story, now’s the time to complete it with imagery. For this, head back to your planning to remind yourself what style you’ll be creating the video in. Will it be an animation, a whiteboard animation or a live action video?
Then it’s just a case of adding your ideas to the storyboard. You could sketch stick figures or insert images from the internet, your computer or design and animation packages. There are really no rules for this but these tips can help:
- Keep it simple: remember that this is a very short video and so any overly complicated visuals might work against you and leave your audience confused.
- Consider visual metaphors: often the most powerful explainer visuals are based on a metaphor or theme that communicates your offering or business in terms your audience already understands well.
- Don’t give your video an expiry date: to ensure you get maximum value from your video, avoid using screenshots of products, prices or information that changes regularly as you don’t want to have to update the whole video every time. Instead use cartoons, illustrations or symbolic versions to ensure it’s always up-to-date (see example below).

Step 4: Bring your video together with animation, directions and effects
Next, plan how your images will appear on the screen and in what order. Focus on which sequence is most logical and will make most sense to your audience. In VideoScribe your images can be drawn with or without a hand, or there’s a variety of animation options like fade, appear and bounce.


If there are any visual effects required for emphasis then make a note of these here too. That could include GIFs or moving parts as well as additional graphic design.
Step 5: Include a call-to-action to measure success
The last step in your storyboard is to add your call-to-action. Once your audience has watched your video and bought into you and your business they need to know what to do next. Whether it’s starting a free trial, downloading further information or heading to your website, make it clear what action you want people to take.
This will help you measure the success of your video and ensure that the investment delivers against your objectives.
Now your beautifully slick storyboard is complete, you’re ready to start creating your explainer video! Sign up for a seven day free trial of VideoScribe today to produce an eye-catching video with ease, no credit card required.
Once you’ve created your explainer video, give it the attention it deserves and share it on social media with #MadeWithVideoScribe for a chance to be featured on our website.
.png "VideoScribe")


![How to create animation magic [3-part guide to video success]](https://blog.videoscribe.co/hubfs/How%20to%20create%20animation%20magic%20guide%20VideoScribe.png)
.jpg)


COMMENTS