
If you've ever wondered how a bland presentation could go from zero to 100 then this is the blog for you. We're walking you through the easy and repeatable steps to turn your PowerPoint presentations into engaging animations from start to finish in just 30 minutes.
You'll no longer have old presentations just sitting on your computer never getting looked at again. Instead you can breathe new life into great content by turning it into videos that get noticed and most importantly, shared. Here's how 👇
This was actually a workshop we hosted at our Sparkol 'Turn up the WOW' event but it was so popular we wanted to share it with our blog subscribers too. So click play below to watch the full session recording, or read on to discover a breakdown of the steps - the choice is yours!
The process for turning presentations into animated videos
Step 1: Decide on the layout of your video
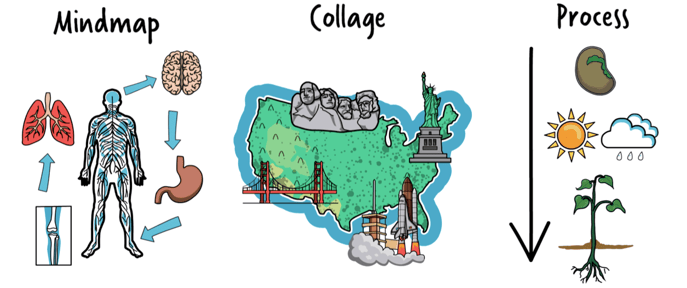
First things first, you need to decide on the structure of your video. By this we mean will it have a linear flow moving from one point to the next, is it a collage of information or is it scenes making up a mind map? Look at the content you have and decide which layout would suit it best. Asking yourself these questions can help:
- Does the content revolve around one certain point or topic? If yes, a mind map structure would work best.
- Are you describing a process or series of events? In which case a linear flow would work really well
- Does your content form part of one overall picture or idea? For this a collage is great as you can zoom out at the end to show all the information in one view.
In our example, as we're explaining a problem and a solution across a set of defined slides, it makes sense to turn each slide into it's own scene.
Step 2: Set the styling
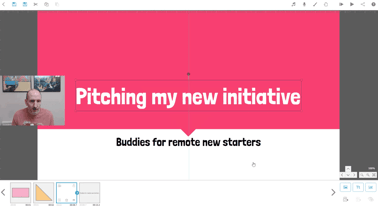
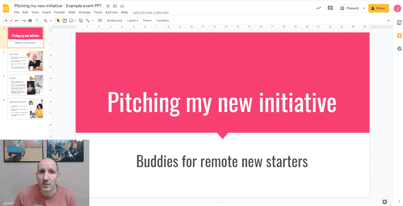
Next we can start bringing design elements from the presentation into your animation. After all, you probably put a lot of work into making your slides look nice, so why waste that effort when you can carry it over to your video?! In our example we use shapes from the VideoScribe library to recreate the pink sections of our slide designs, coping the color hex codes to make sure they're exactly the same. Here you can see the PowerPoint on the left and the VideoScribe version on the right 👇
Then do the same with fonts and any other background elements like photos and patterns - just upload the images into VideoScribe or recreate elements using images from the VideoScribe library. That way, you're also making use of existing creative assets and getting extra value from them - a win-win!
Step 3: Translate text and bullet points into visual elements
Now, slides are often pretty wordy - think death by bullet points... We definitely don't want to recreate that in animation! Some headings will be useful to carry over but beyond that we just want to turn the concepts and ideas and into visual versions that will help stimulate the senses and explain more complex ideas quickly.
As a general rule you can normally take any one bullet point and convert it into one image. This is a good starting point to help you chunk up your information and carry it over.
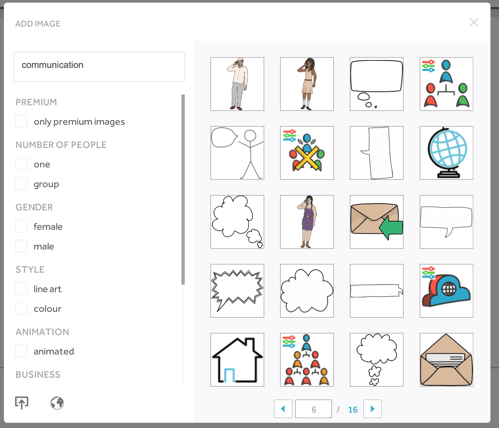
TOP TIP: Pick a key word from your bullet point and search for related images in the VideoScribe library. For instance if your bullet point is all about the importance of communication you could search for 'Communication' in VideoScribe and pick from these great images 👇
Step 4: Select your animation options
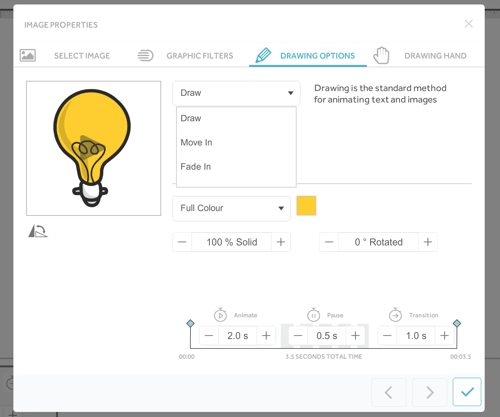
Once your images are in place, it's time to have fun with animation! By default each element (text and images) will animate automatically, but in some cases it might make sense for images to appear or move in instead of being drawn. Especially if you want quite a lot of images to appear in quick succession, or you have background elements that don't need to be drawn in and can just fade into the background.
To edit the settings, just double click on an image or text box and then choose how you want it to animate from the 'Drawing Options' tab.
Step 5: Adjust animation times
Once all your elements are in order and you're happy with how your content is progressing, it's time to go back in and adjust the animation time for each element and add any pauses or delays you need.
You could have the most incredibly designed video with awesome information, but if it's being displayed too quickly to be taken in, or takes forever to watch then your audience will switch off. So taking the time to watch each scene through and make sure it plays as the right speed for your content is super important.
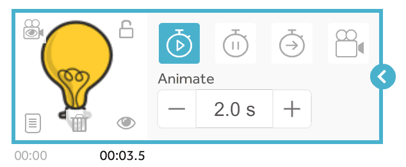
You can edit three elements of the animation timings for each image or text box from the timeline:
- Animation time: this is how long it takes for your image or text to be drawn/fade in/move in.
- Pause time: this is the amount of time where no animations will take place. It's great for longer passages of text or more complex images where you want to give your audience longer to take it in.
- Transition time: this is how long it takes to move from animating one image to the next. Generally you want this on zero unless you're transitioning from one scene to another and want to be able to see the canvas move.
Step 6: Create the rest of your scenes
Now that you've practiced this process with one slide - it's just a case of repeating the process to create the rest of your video, carrying key information over from each slide and translating text into imagery as you go!
Just remember, stick to the layout you decided on at the start - so if you chose a collage style, ensure your points are close enough to each other on your VideoScribe canvas so all of the information is still readable when you zoom out at the end. Likewise, if you chose a mind map style video, move your points to appear around your central theme or idea.
Step 7: Add background music
Now your video looks great, it's time to make sure it sounds impressive too. So let's start with background music - this will give your video a professional edge, smooth over any sections without voice-over and make the viewing experience more enjoyable.
Just make sure you pick the right track for your content. If you're presenting exciting new developments that you want to excite your audience about then pick an upbeat and fun track. However, if your content is more serious and you want your audience to recognize the importance of your message then pick a simple slower track that won't distract from your story.
Plus, finding the right track from the VideoScribe library is easy. Use our filtering options to refine your search by music length, genre or tempo. Alternatively, upload your own tracks from royalty free music sites (check out our favorites here). Learn more about adding music to VideoScribe videos in our tutorial 👇
TOP TIP: Remember to bring the volume of your background music down so it doesn't compete with your voice-over!
Step 8: Record your voice-over
The final step is to record or upload your voice-over. This will ensure your video is not only more easily understood, but that it appeals to auditory learners too. You can often use slide speaker notes as prompts for this, or write a dedicated script. For best recording results, consider the following:
- Where you’re recording - is it quiet and have you turned off any air conditioning units? How big is the space, do you need to reduce echo with cushions?
- Your voice - have you warmed your voice up? Is your posture and position right? Are you smiling?
- Do you have all the right equipment? Have you got high quality headphones to listen back to your recording and is your microphone set up properly? It should be 6-12 inches from your mouth.
You can find our full list of tips and tricks to improve the quality of your voice-over in our downloadable checklist. This list is designed to be used before any voice-over recording to ensure you sound like a pro 👇
 With that, you're ready to animate! Put your knowledge into practice by turning one of your presentations into your own animated video. Start a free 7-day trial (no credit card needed) or join our creative community by becoming a VideoScribe subscriber! 👇

.png "VideoScribe")


![How to create animation magic [3-part guide to video success]](https://blog.videoscribe.co/hubfs/How%20to%20create%20animation%20magic%20guide%20VideoScribe.png)
.jpg)

COMMENTS