It’s safe to say we've all used - and probably own a subscription to - Microsoft’s PowerPoint software. Whether that’s because it comes as standard on your work device, or perhaps you need it for a university project. Our question is, with this subscription, how many of us are using PowerPoint as more than just a simplistic slide sharing presentation tool? In this edition of the Transforming Videos 101 series, we’re exploring how you can use VideoScribe and video to create show stopping PowerPoint presentations.
Like all blogs in the Transforming Videos 101 series, we’ll be using our ‘Penne for your thoughts’ video because a) we love pasta, and b) we love puns. Check it out:
Like what you see? Did you know you can create your own whiteboard animation style videos with VideoScribe - sign up today to get access to our 7 day free trial.
Add constantly moving elements to any slide
We recently hosted a webinar, ‘A masterclass in creating educational videos that wow’, and a question that kept getting asked is, “How did you create the slides?” which included a range of moving elements. Want to see what everyone was on about? Watch our webinar here. If you don’t have the time, don’t worry - we’ve got everything covered below.
Keeping people engaged and actively absorbing the content of your presentation is a challenge for anyone which is why we recommend using elements that move. This captures the attention of the eye and keeps your audience drawn in to what you’re saying. Adding moving elements to a slide is a very easy process. To quickly summarize the process before breaking it out into individual steps, you turn chunks of video into GIFs which will automatically play on your slide.
Step 1: Create your moving elements in video format
Open your preferred video creation tool - for us, our is VideoScribe - and create a video which highlights the moving elements you’d like within your slide. Here’s our video that we want to include on the PowerPoint slide:
Step 2: Convert your video into a GIF
In our first edition of the Transforming Videos 101 series, we discuss ‘How to create an animated GIF from your video’. Follow these steps to transform your video into an automatically animating GIF. Here’s the finished product:

Step 3: Add your converted to your PowerPoint
Now that you have your continuously looping GIF, you need to stick it in your PowerPoint presentation. Open your PowerPoint presentation, go to Insert within the PowerPoint ribbon or along the top task bar, select Photo and Picture from File. Locate your converted GIF and insert. When you insert your GIF, the first frame will be the only thing you see. It’s not until you present your presentation that you see the animation in action. To view our finished slide, click here and preview as a live presentation.
You can be so creative with this technique in PowerPoint presentations. But if you don’t have the time to transform your videos into GIFs, you can simply embed your video directly into a PowerPoint presentation...
Embed a video into PowerPoint that plays without internet access
Full disclosure, this simple technique comes by using our VideoScribe app so of course, we’re biased because we think it’s awesome. But we're not alone - our user, Julie, wrote us a really cool review saying “Great tool that is only restricted by your own creativity and is such a fun space to work in…” check it out for yourself here.
Step 1: To get your video ready for a PowerPoint presentation, create your video in VideoScribe from scratch or by using one of our Template Scribes.

Step 2: Once you’re happy with your video, click the Download or Publish Scribe Video button on the top right-hand corner.
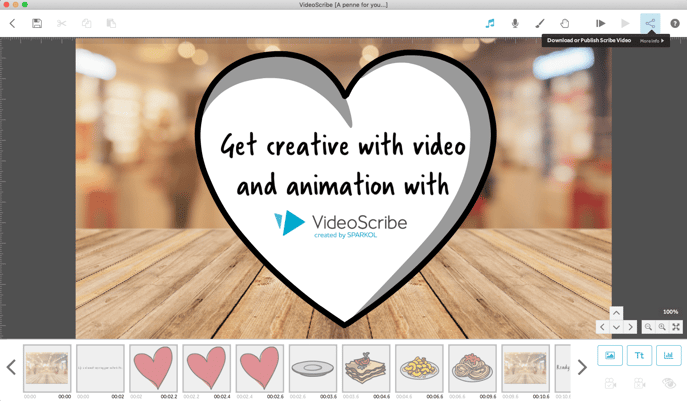
Step 3: Here, select Download as PPT and VideoScribe will render your video within a PowerPoint presentation, ready for you to add in an opening, closing or information slide to complete your presentation.
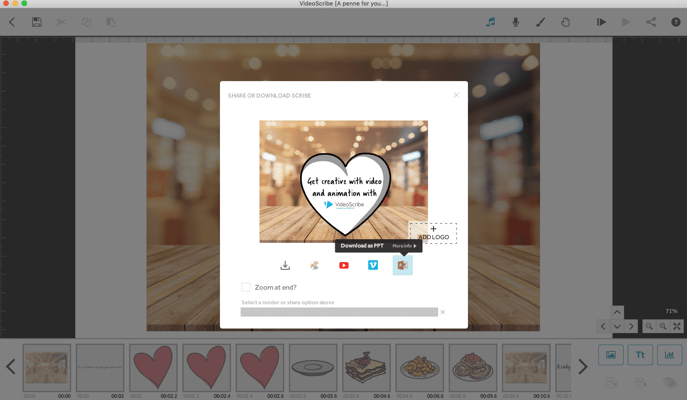
Want to see the final output? Click here to see our PowerPoint presentation, created directly from VideoScribe. Now, when you present your PowerPoint, your video will play on the full screen with sound!
So, now you have the knowledge (and the tool, thanks to VideoScribe) to take your PowerPoint presentations from shabby to chic. We hope your audiences enjoy what you have to share. Stay up to date with other ways to transform your video into more than just a story with our next edition of the Transforming Videos 101 series.
If you’d like to create a similar video about how much you love pasta, pizza, or just the Italian cuisine in general like us, sign up to your 7 day free trial with VideoScribe.


.png)


![How to create animation magic [3-part guide to video success]](https://blog.videoscribe.co/hubfs/How%20to%20create%20animation%20magic%20guide%20VideoScribe.png)






COMMENTS