Whether or not you agree, we think video creation is incredibly fulfilling and satisfying. To be able to take an idea and create a visual and audio experience for your viewers is something we pride ourselves on with VideoScribe. Regardless of your video or design experience, you can use VideoScribe to produce professional looking videos in minutes. And what's even better is, we know so many tricks to get you using your video in so many more engaging formats which is why we created our Transforming Videos 101 blog series. So far we've covered off:
Like what you see? You can create your very own video on a 7 day free trial with VideoScribe. Click here to get started. 
Before we get into how to create JPEG or PNG image sequences, we’re going to explain the difference between the two. Both a JPEG (.jpg or .jpeg) and PNG (.png) are two types of image files however, a JPEG uses lossy compression whereas a PNG uses lossless compression. This basically means a PNG image is higher quality than a JPEG (and supports a transparent background - JPEGs do not!).
Why image sequences are useful
Why would it be useful to transform your video into an image sequence? Well, generally in situations where you want to use alpha channels, image sequences enable you to capture this. Equally, if you weren’t completely sure on the required frame rate, you can export to an image sequence and put it back together yourself. Our in-house creative team can’t even remember the last time they exported anything other than an image sequence when using VideoScribe!
So, you now know the difference between the two and you know the reasons why... how can you transform it into a series of PNGs or JPEGs? The process to generate your images has been made incredibly straightforward with VideoScribe.
How to create an image sequence from your video
Step 1: Open the 'Download or Publish' options
Once you're ready to publish your video, click ‘Download or Publish Scribe Video’.
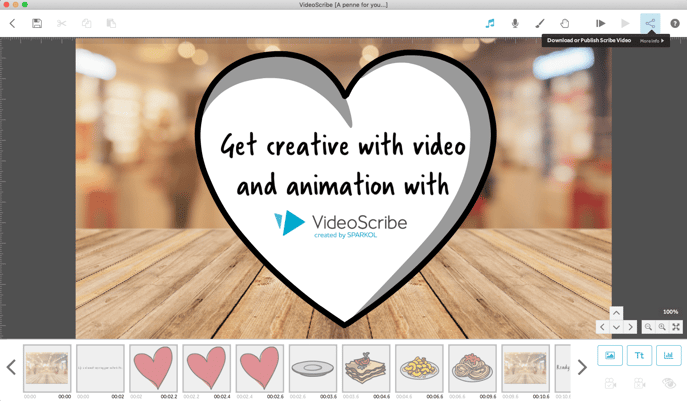
Step 2: Choose the file type for your image sequence
Click on the dropdown and choose 'Image Sequence (PNG) or Image Sequence (JPG)' depending on the image type you're after.
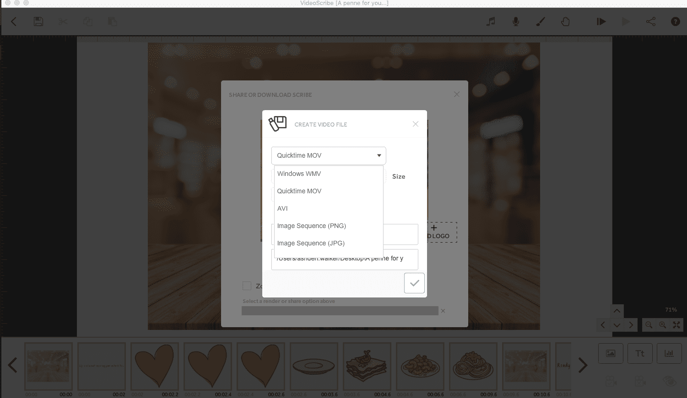
Step 3: Set the file options and render your image sequence
Choose your size and frame rate, then click the Tick button. Now your video will render into individual image frames. Easy as that!
Using our range of tips and tricks, you’re now one step closer to creating more pasta-bilities with your video and get your message heard! To get started on your free 7 day trial, click here. Plus, there is no credit card or payment information required upfront.


.png)



![How to create animation magic [3-part guide to video success]](https://blog.videoscribe.co/hubfs/How%20to%20create%20animation%20magic%20guide%20VideoScribe.png)





COMMENTS