
Loads of people have been asking us how we combined scribe and film in our spooky Halloween promos. So I've put together a quick guide on combining VideoScribe with live-action video to make title sequences, animated characters and more.
I want to make a short film about the camping trips that I've been on this summer and I'm going to use VideoScribe to make the titles. In this case, I just want to overlay the words 'summer camping' onto some of the footage.
Using VideoScribe to make these kind of overlaid images saves you days of work that you'd have to spend animating by hand otherwise. It also produces a really clean final effect.
If you're interested in creating this effect you'll need a Pro subscription to VideoScribe (so you can export the scribe as a PNG sequence) and an editing program that lets you layer video and image sequences.
I used Adobe Premiere Pro, but you could also use Adobe After Effects, Final Cut Pro or a free program like Lightworks.
Step 1 – Make your scribe
I start with my scribe, making sure that the objects are in the right place and that I'm happy with how the camera's set, the draw time and the pauses.
Things to consider:
- Hands – It's up to you whether you have a hand in your scribe or not (I think it looks better without).
- Alignment – It's useful to take a frame of your video and import it as a still image into VideoScribe so you can see how your scribe will look on top of your footage. Just remember to delete the still image before you export.
- Backgrounds – Don't worry about adding a background or soundtrack, only the text and image elements get carried over when you export to PNG.
- Erasing – The erase feature in VideoScribe uses white shapes to give the illusion of erasing objects. If you use this feature in your scribe, white shapes will appear in your footage.
Step 2 – Export to PNG sequence
Now that I'm happy with my scribe, it's time to publish. Click the publish button in the top right hand corner of the screen.
On the first publish screen you need to click the left hand button which means 'Save to drive'.

On the next screen, change the format to 'Image Sequence PNG'. The other settings are up to you, but I like to use 1080 and 24fps. Look at your video footage – it's best to set the scribe frame rate to the same fps.
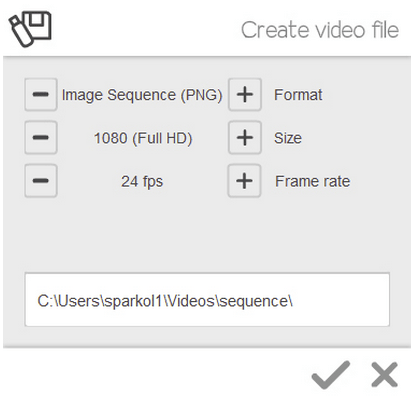
When you set the target destination for the file to export to and click the tick, VideoScribe creates a folder called 'Sequence' in the location that you specify.
This new folder will contain all of the images that VideoScribe would render to create a scribe.
Step 3 – Import into video editing software
You now need to open up your video editing program and import your video footage, ready to add your scribe over the top.
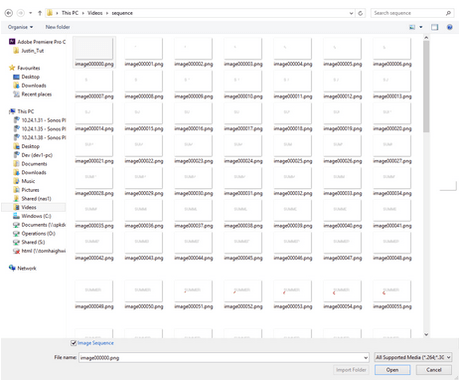
To import your scribe, find the 'Sequence' folder through your program's import dialogue.
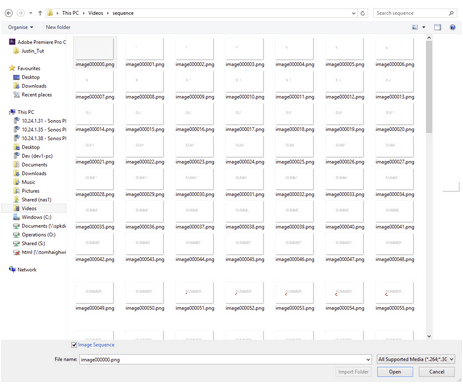
In Premiere Pro, I am given the option to tick 'Image Sequence' at the bottom of the import box. I click 'Open' and it brings my scribe into the program, ready to use.
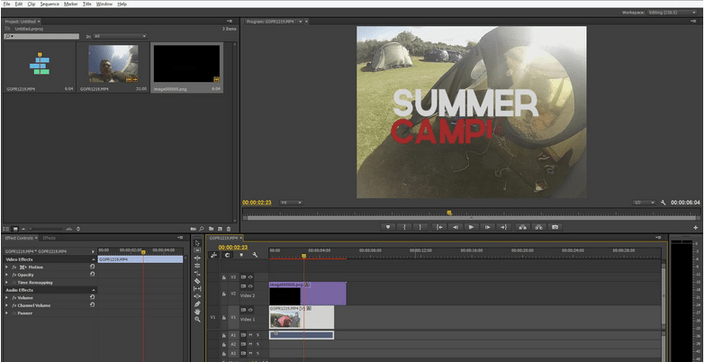
Step 4 – Layer your scribe and film footage
When you have both your scribe and video imported you can start layering them.
Drag your scribe clips onto the timeline, making sure that the video layer is underneath the scribe layer. You can then edit them and speed them up or down so that they match up with your video clip.
I hope this gives you a good general idea of how I make these videos. We'll be bringing out more detailed guides on advanced techniques soon.
If you've overlaid a video using VideoScribe before, we'd love to see your videos – please get in touch via Facebook or Twitter.
.png "VideoScribe")


![How to create animation magic [3-part guide to video success]](https://blog.videoscribe.co/hubfs/How%20to%20create%20animation%20magic%20guide%20VideoScribe.png)


.jpg)


COMMENTS