Stop-motion videos can bring your ideas to life in a unique and entertaining way. Imagine a series of images seamlessly transitioning to tell a story or showcase a concept. With VideoScribe, creating stop-motion videos like the example below is not only easy but also a whole lot of fun. In this guide, I'll walk you through the process, step by step, and by the end, you'll be ready to embark on your stop-motion animation journey.
Getting started: setting the stage
-
Collect your images: Gather all the images you want to use in your stop-motion sequence. These could be a series of positions, different poses of a character, or related images that convey a narrative.
-
Arrange and position: Organize your images in the desired order on the timeline and position them on the canvas. This step is crucial to ensure a smooth flow in your stop-motion animation.
-
Create movement: For a dynamic effect, space out the images. If you want the image to change in the same position, layer them on top of each other. Use the 'Hide Element' feature to reveal the concealed images while editing.
-
Maintain consistency: Ensure all images are at the same scale, maintaining visual coherence throughout your stop motion video.
Bringing your images to life
-
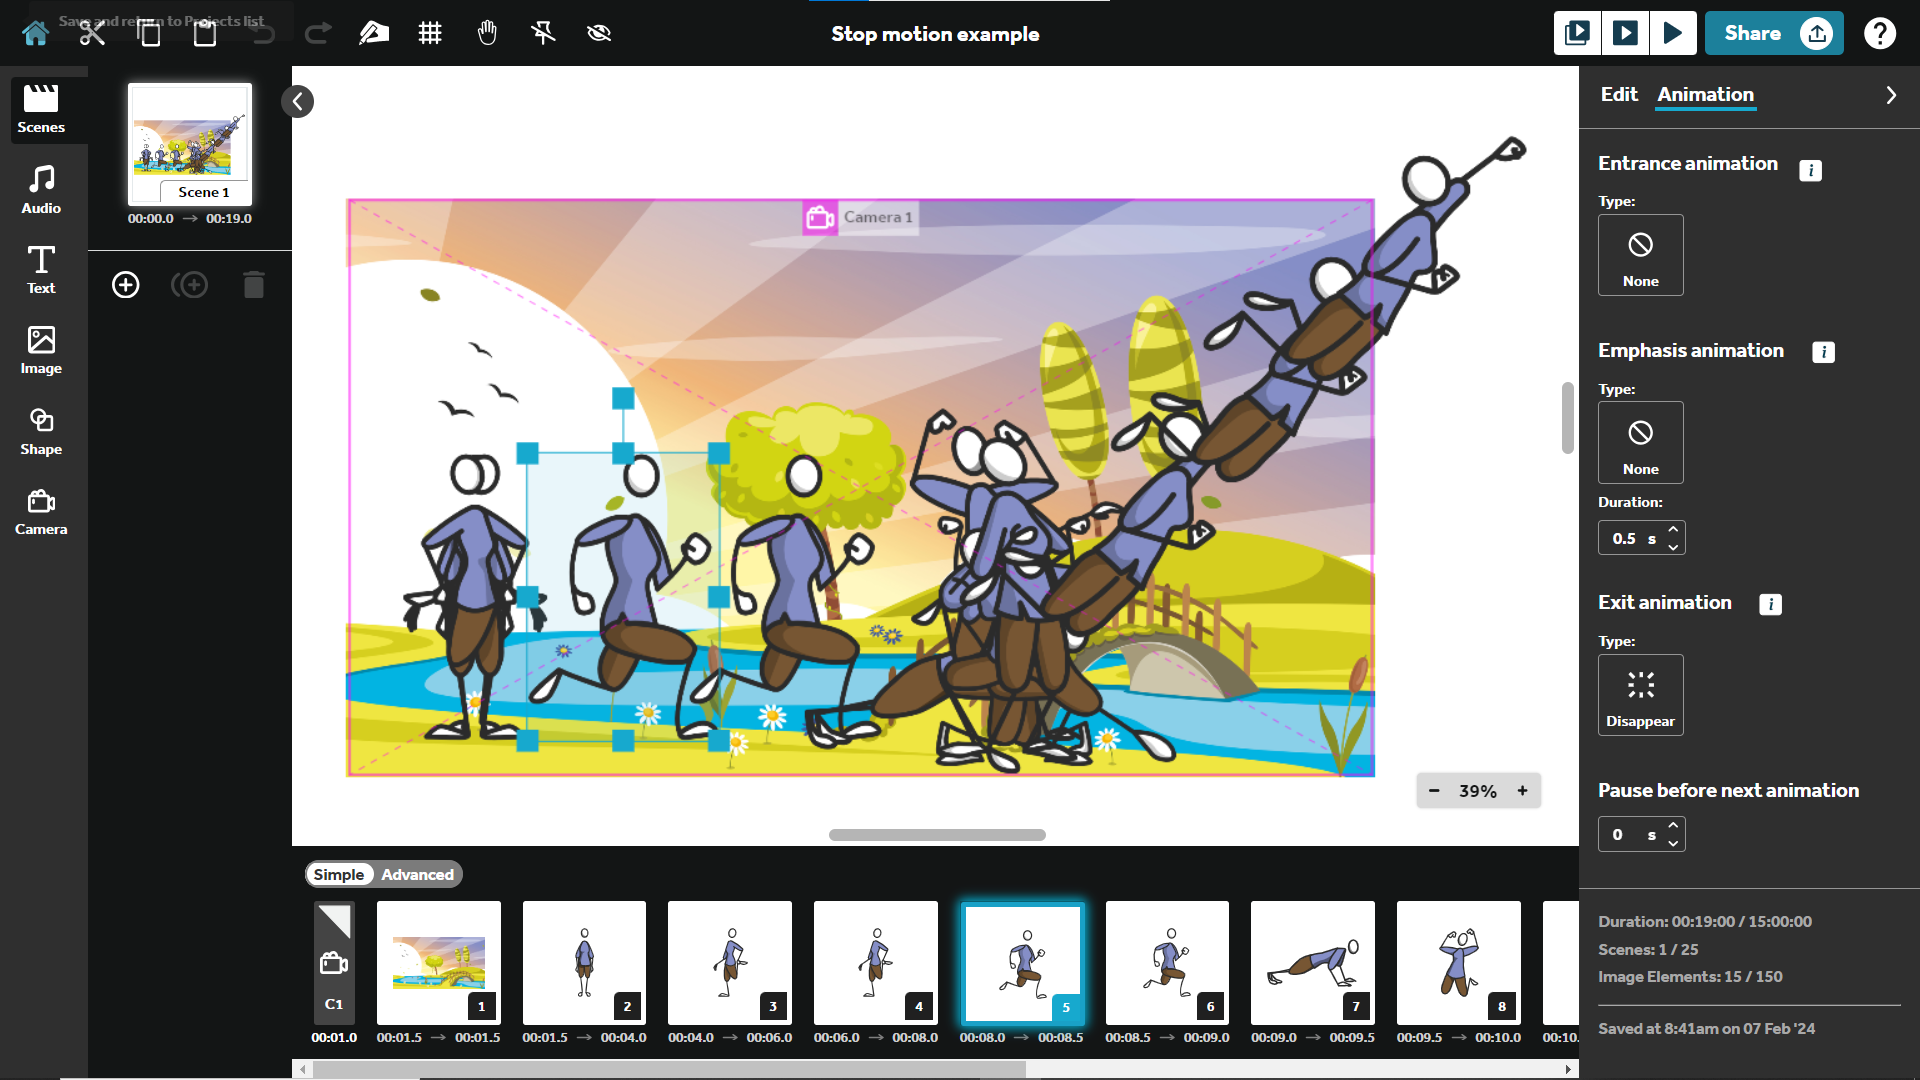
Set the scene: Decide how you want the first image in the sequence to appear. Choose an entrance animation type and duration. For example, you can start with the first image being drawn to kick off the sequence.
-
Fine-tune entrances: Keep the entrance animation of all other images in the sequence set to 'None.'
-
Smooth transitions: Set the exit animation for all images (except the last one) to 'Disappear' and set the pause time to zero. This ensures a seamless transition between images without any gaps.
-
Timing is everything: Control the timing of your animation through the emphasis animation, which occurs between the entrance and exit animations. Set the Emphasis animation type to 'None' for all images (except the last one) and adjust the duration for each image to determine the pace of your animation.
-
Create movement illusion: For a smooth movement effect, use the same emphasis duration time for each image. Typically, a half to one second works well, but feel free to experiment with longer timings for pauses or slower movements.
-
Final touch: The last image in the sequence usually shouldn't disappear. Set the exit animation type for this image to 'None,' and use the Pause time to determine how long to wait before moving on to the next part of your project.
The image below shows how our example video was created in VideoScribe as well as shows the key setting used for this technique in the right-hand panel.

Pro tips for effortless animation
Copy and paste magic: Save time by using the copy and paste feature. Most images in the sequence will have similar animation settings, so set up the first one and replicate it. If you need to change the image, you can just use the 'Replace Image' option on the edit tab.
Why stop motion videos?
Stop-motion videos offer a unique and engaging way to convey ideas, tell stories, or showcase products. The charming, handmade aesthetic adds a personal touch, making your content stand out. Whether you're an educator, marketer, or content creator, stop-motion videos can breathe life into your message, making it memorable for your audience.
Creating stop-motion magic with VideoScribe
Now that you have the basics down, you might wonder how to put this knowledge into action. VideoScribe makes the process seamless with its user-friendly interface and powerful features. To create your first stop motion video, follow the steps above using VideoScribe's browser version. Experiment with different images, animations, and timings to bring your ideas to life.
Stop-motion videos are not just animations; they are a canvas for your creativity. With VideoScribe, the only limit is your imagination. So, dive in and sign up for a free trial, unleash your creativity, and let the world see your stories through the captivating lens of stop-motion animation.


.png)


![How to create animation magic [3-part guide to video success]](https://blog.videoscribe.co/hubfs/How%20to%20create%20animation%20magic%20guide%20VideoScribe.png)


COMMENTS