If you're not adding captions or subtitles to your videos, you're missing out on a big marketing opportunity. Take Facebook as an example, where up to 85 percent of videos are watched without sound.
The reality is that many people prefer to watch videos with captions turned on, or even read a transcript posted alongside the video itself. For example, they might be on public transport, in a waiting room, or not wanting to disturb others around them.
More importantly, captions make your videos accessible to a wider audience, including non-native speakers and the deaf and hard of hearing.
Captions also provide SEO benefits: Their text can be crawled and indexed by search engine robots, making your video discoverable for a larger number of keyword phrases.
In this tutorial, we'll look at the most common caption and subtitle formats, as well as how you can easily create your own closed captions using free software.
First, some basic definitions.
Captions versus subtitles: What's the difference?
In the US and Canada, a distinction is made between captions and subtitles.
Captions are intended for viewers who can't hear the audio. In addition to a transcript of the speech or dialogue, they include speaker labels and a description of non-speech sounds.
Subtitles, on the other hand, assume that viewers can hear the audio but need a text alternative – for example, when viewers don't understand or aren't fluent in the language spoken in the video. Subtitles include a transcript of just the speech or dialogue.
Whether you choose to provide captions or subtitles will depend on your target audience and your video's intended application.
Closed captions versus open captions
Closed captions can be turned on or off, whereas open captions are burned into the video track and are therefore always visible.
The advantage of closed captions is that they give your viewers the choice of watching the video with or without text, depending on their preference.
On some social media platforms (Twitter, for example), if a video has closed captions, they'll automatically be shown to people using mobile devices with the sound turned off. Otherwise, closed captions are usually toggled on or off using the "CC" icon on video players.
Note: Sometimes it makes sense to use open captions. Instagram, for example, doesn't currently support closed captions. In this case, if you wanted to provide captions for your viewers, you would have to hard code them into the video. You can do this using a free video transcoder like HandBrake.
Common subtitle and caption file formats
There are many different subtitle formats, but you don't need to be familiar with them all. In most cases, you'll need one of the following two formats:
SubRip Subtitle (SRT):
The SRT format is the most widely supported of subtitle and caption formats. It is a plain-text file with an .srt extension that can be created manually using a text editor. SRT subtitles are compatible with the majority of social media and video hosting sites, as well as many other video players, including VLC Media Player. The downside of the SRT format is its limited options for formatting subtitle text.

The four parts of an SRT file include:
- The number of the subtitle or caption sequence (1, 2, 3, etc.).
- Time codes indicating when the subtitle should start and stop, separated by an arrow ( --> ). The standard time format is hours:minutes:seconds,milliseconds. (Note the comma before milliseconds.) Milliseconds are rounded to three decimal places.
- The subtitle text. This is often two lines.
- A blank line before the next caption sequence begins.
WebVTT (VTT):
WebVTT (Web Video Text Tracks Format) is the W3C standard for specifying timed text tracks using the HTML5 <track> element in a <video>. It was originally based on SRT and looks similar; however, it offers more formatting options, including the ability to modify the font, color, and positioning of subtitle text using CSS.
Additionally, WebVTT supports adding comments, video descriptions, navigation chapters, and metadata to subtitle files.
WebVTT is the subtitle format of choice for many HTML5 media players. As with SRT files, you can create or edit a WebVTT file in a text editor (saved with the extension .vtt).
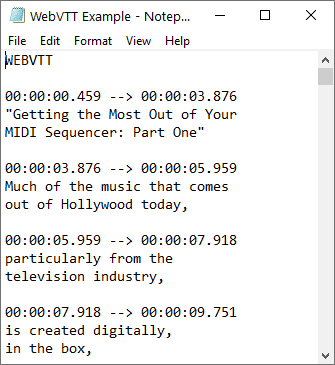
A VTT file starts with the line "WEBVTT."
Unlike in SRT files, sequence numbers in VTT files are optional. Timings are also formatted a little differently, using a period instead of a comma before milliseconds.
As with SRT files, each VTT subtitle sequence is separated by a blank line.
What subtitle format should you use?
The following is a quick overview of some common social media sites and video players and their supported subtitle/caption formats:
- YouTube: SRT, VTT
- Facebook: SRT
- Twitter: SRT
- Vimeo: VTT (recommended), SRT (supported)
- Camtasia: SRT
- VLC Media Player: SRT
- PowerPoint for Windows: VTT
Recommended free subtitle editing software
As noted, you can create SRT and VTT files manually using any text editor, but the process is tedious and the timings of the subtitles are likely to be imprecise.
Using subtitle editing software, you can create, edit, and convert your own subtitle files with less hassle and greater precision.
Some good free subtitle editors include:
- Subtitle Edit: A free, open-source subtitle editor that works with 280+ different subtitle formats. It uses DirectShow, VLC Media Player, or MPlayer.
- Subtitle Workshop: Another free subtitle editor that supports over 60 subtitle formats.
- DivXLand Media Subtitler: If you have a transcript, you can use this free subtitle editor to create external subtitle files very quickly by clicking your mouse to sync lines of dialogue during video playback.
Creating an SRT file in Subtitle Edit
Now let's look at how to use Subtitle Edit to generate an SRT subtitle file.
Step 1: If necessary, prepare a transcript.
If you wrote your script before recording the video, you're all set. But in some cases, you may need or want to generate one – for instance, if you ad libbed your video or you need to translate your subtitles into other languages.
Auto-transcription tools abound, but the free ones don't produce amazing results. To give your viewers the best experience, we recommend hiring a transcription service or transcribing the video yourself using software to speed up the process (see the top-recommended free transcription software).
Step 2: Download Subtitle Edit here and install the program.
Step 3: Open your video in Subtitle Edit
Launch Subtitle Edit. Drag and drop your video onto the video player in the upper right corner. In the bottom right of the Subtitle Edit window, a waveform will appear.
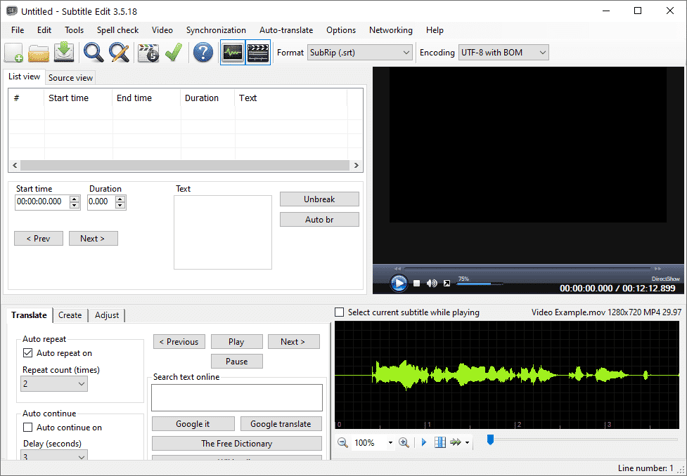
You can navigate through the waveform using the arrow keys on your keyboard or the scroll wheel on your mouse. Click anywhere in the waveform to jump to that part of the video.
Step 4: Set subtitle display preferences
Optionally, navigate to Options > Settings to set display preferences for your subtitles. For example, you can specify limits for maximum line length, maximum characters per second, and maximum words per minute.
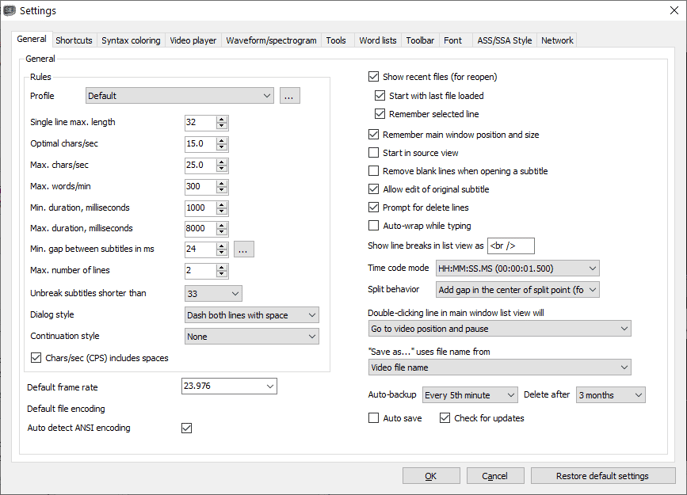
Taking the time to adjust these settings can give your viewers a better experience (and depending on how your video will be used, specific settings may be required).
If you're unsure what settings to put here, use the following resources as a starting point:
- DCMP Captioning Key – Best practices for captioning educational videos. As an example, DCMP recommends that captions for lower-level educational media not exceed 130 words per minute.
- ADA compliancy rules – In many government and educational institutions, ADA-compliant captions are required. ADA recommends not including more than 32 characters per line.
When you've finishing adjusting your settings, press OK and return to the main Subtitle Edit Window.
Step 5: Add subtitles and adjust timings
Click and drag anywhere in the waveform to select a part of the video for subtitling. The waveform peaks indicate where speech starts and tapers off, letting you adjust your timings with precision. You can play back your selection by right clicking it and choosing "Play selection."
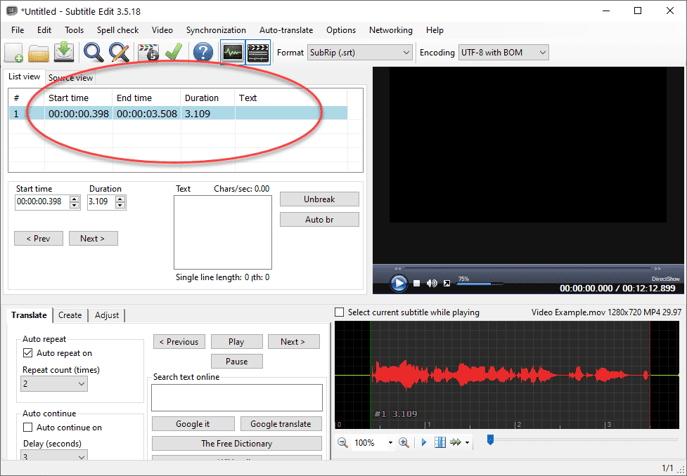
When you've made a selection, right-click on it and choose "Add text here." The start and end times of your selection will appear in the list view in the upper left of Subtitle Edit.
Step 6: Add your subtitle text
In the large blank Text field, type the spoken words that correspond to your video selection. Your subtitle text will auto populate under the Text column in the list view.
Note: If you have a transcript open in Microsoft Word or a text editor, you can copy portions of the transcript to your clipboard, switch to Subtitle Edit and select the corresponding section of video, right click on your selection, and choose "Add text from clipboard here."
Play back the selection and make adjustments as necessary to ensure the subtitles are well synced.
Right clicking on the selection will display a variety of editing options, such as deleting the text, splitting the subtitle at your cursor location, or merging the subtitle with an adjacent subtitle.
You can also double-click on the subtitle in the list view to jump to that section of the video.
In the screenshot below, notice that the number next to "Single line length" has turned red. Also, the subtitle entry itself (in the list view) is highlighted in red. In Subtitle Edit, red indicators appear when you exceed the limits that you set under Options > Settings (step four). In this way, Subtitle Edit notifies you of any errors, letting you revise your subtitles to match the display rules you set initially.
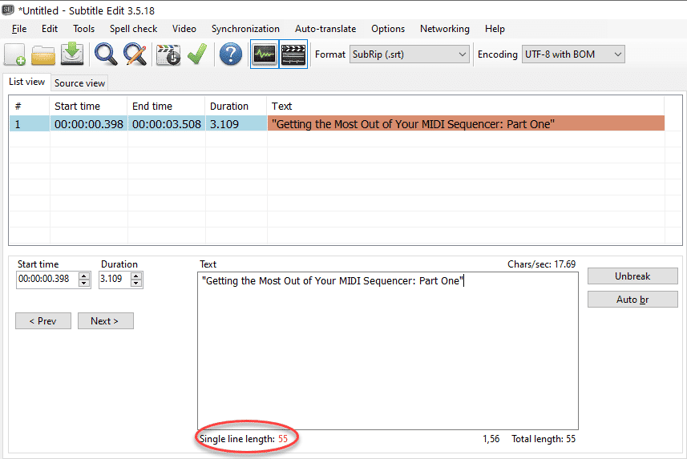
In this case, Subtitle Edit is telling us that the subtitle is longer than the max line length of 32 characters that we defined in step four. To fix it, we can either break the line manually by placing the cursor somewhere in the text and pressing enter, or we can click on the auto-break button ("Auto br") to the right of the Text field. Subtitle Edit will do its best to break the line in a logical place.
Step 7: Repeat steps five and six until you've created the rest of your subtitles
Save your finished subtitles in SRT or VTT format, depending on the platform where they will be used. The subtitle file should take the same name as the video file. For some platforms, you may need to rename an SRT file for it to work properly. (For example, Facebook requires the naming convention filename.[language code]_[country code].srt.)
Most social media sites and video hosting platforms let you upload your subtitles as a sidecar file (i.e., separately from the video), making encoding them unnecessary. If you need to encode your subtitles into the video for any reason, you can use a free program like HandBrake.
Converting subtitle files
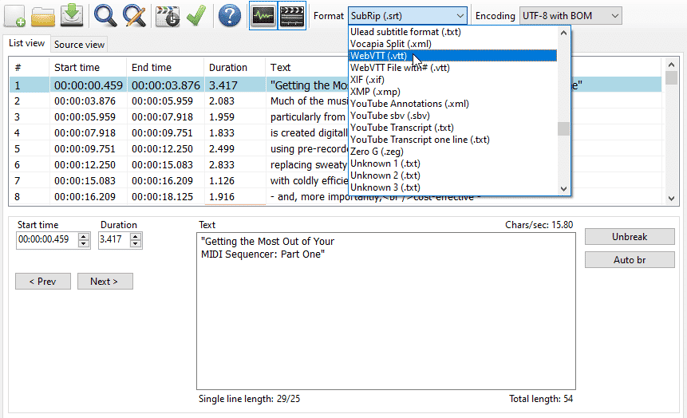
If required, you can easily convert your subtitles between SRT and VTT format: Open your subtitle file in Subtitle Edit and choose the new format in the Format dropdown menu (shown below). Then navigate to File > Save As and re-save your subtitle file in the new format. Thanks to this feature, you can distribute your subtitles across multiple platforms with minimal work.
When it comes to captioning your videos using free software like Subtitle Edit, it can take some time to learn all the features and develop an efficient workflow. However, it's well worth the effort, as you'll not only increase your video's exposure, but you'll also gain the respect of those of your viewers who otherwise wouldn't be able to enjoy your video.
Author bio:
Chloe Brittain is the owner of Opal Transcription, an audio and video transcription service providing the highest-quality transcripts for businesses, media professionals, and academic institutions in the United States and Canada.
.png "VideoScribe")


![How to create animation magic [3-part guide to video success]](https://blog.videoscribe.co/hubfs/How%20to%20create%20animation%20magic%20guide%20VideoScribe.png)


.jpg)


COMMENTS