
We’ve just released VideoScribe v3.2 and it’s now ready for you to download from your account page. Here's a summary of what's new.
New timeline quick menu and additional options
We’ve introduced a new timeline quick menu which allows you to easily set element timings and control camera position directly from the timeline. This replaces the previous menu which popped up above the timeline.
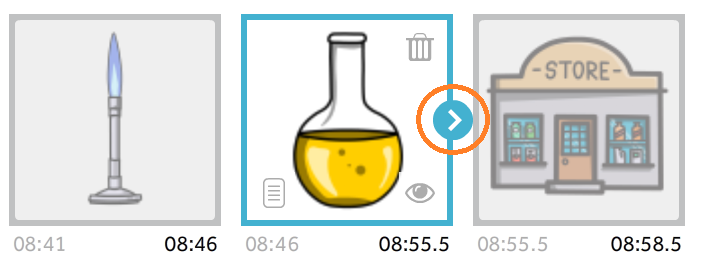
When you have an element selected you can click the small arrow on the right of the timeline item (outlined orange in the image above) to open and close the new menu. The menu will slide out to the right of the selected timeline item.
From this menu you can select the icons along the top to change the following settings (outlined blue in the image below):
- ‘Animate’ - adjust the animate time for the element
- ‘Pause’ - adjust the pause time for the element
- ‘Transition’ - adjust the transition time for the element
- ‘Camera Settings’ - this provides options to set, clear and view the element’s camera position
The timing controls in this menu operate in the same way as they do in the properties screen. You can click the ‘+’ and ‘-’ buttons to increase or decrease the time by 0.5 seconds or click on the time to input a new value to the nearest 0.1 seconds.
By default, VideoScribe will remember the current state of this menu so that when you select a new element it will either stay open with the same option, or it will stay closed. This allows you to perform a series of similar tasks quickly, for example adjusting pause times.
We have also introduced new icons to the timeline item tile for the selected element. You still have the ‘Hide’ / ‘Unhide’ (outlined green in the image above) option in the same place, but we have added new icons for ‘Properties’ (outlined yellow in the image above) and ‘Delete’ (outlined red in the image above) to make it easier to access these options.
Double-clicking timeline item opens properties
You can now double-click the timeline item to quickly open the properties screen for the element. Previously this was not possible as clicking the timeline item twice was used for the ‘View camera’ option. We found that users did not find this very obvious, which is why we added ‘View camera’ as an option on the new timeline quick menu (as well as on the canvas right-click menu).
Adjust greyscale contrast
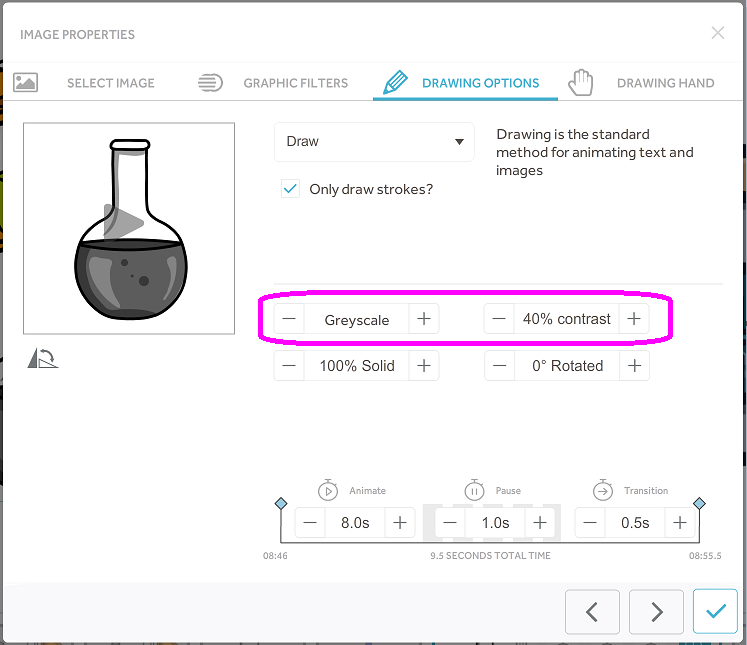
As well as these changes to the Outline and Silhouette modes we've added more control to the Greyscale mode as well! In Greyscale mode, you can now adjust the greyscale contrast level (outlined pink in the image below) from the 'Drawing Options' tab on the 'Image Properties' screen.
A 'What’s New' screen
We have introduced a ‘What’s New’ screen to provide in-app details of all the new features, improvements and bug fixes introduced in each new release. This will be shown at login after installing an update.
You can disable the automatic appearance of this screen by selecting the ‘Don't show this update again’ tick option, at the very bottom of this page. If you would like to view this page again, at any point, you can do this by clicking the ‘Show Feature Screen’ button which is found in the ‘About and Help’ page.
Minor improvements and bug fixes
VideoScribe images use what is known as a reveal stroke on colour images to make them appear like they are being coloured in by hand... neat right! In some modes and animate methods these reveal strokes do not work as well, so in v3.2 we've made some changes to allow for that. In Outline mode, VideoScribe will now ignore this stroke as there is nothing to colour in. These fill lines will also be hidden during morph transformations. The opposite is true in Silhouette mode, VideoScribe will no longer draw the lines for an image - it will only reveal the silhouette block of colour.
This release also includes improvements to timeline scrolling. We have fixed an issue where images were brought in at the wrong scale when replacing an image from the image properties screen. We also had some reports of the Import Image icons disappearing from the bottom of the Add Image screen, so we have fixed this.
Wow, all those improvements sound great! How do I upgrade to v3.2?
If you would like to upgrade to the latest release of VideoScribe, simply download and install it from your account page. For detailed instructions on how to do this please see the below links.
.png "VideoScribe")


COMMENTS